
How to Make Homemade Gelli Plates
I think I’m confident in saying that regardless of anyone’s income, the vast majority of artists like to save money when purchasing their materials. This is no exception for anyone who uses Gelli plates for their printmaking. For those uninitiated with Gelli plates and printing, one coats a slightly sticky, thick sheet of gelatin with a thin layer of water-soluble ink or paint; this coated sheet is then pressed against a non-glossy leaf of paper. Before pressing, the ink or paint can be moved about with an applicator, stamped or stenciled onto, or gently scraped from the paint to form images. Thin, flexible objects can also be placed in between the coated plate and paper to form shapes on the paper that are devoid of ink. There are other techniques that can be utilized, but I were to explain them, I would be deviating a bit too much from the purpose of the post. Some of the classes Teaching Artist Laurie Brown has taught for Path with Art have utilized these items.
To connect the issue of expense and income with the acquisition of art supplies and Gelli plates, if you had visited the above link to the store page for Gelli Arts, you may have noticed something concerning: the plates have a steep price tag! A 3 inch by 5 inch plate costs $12.95, not including taxes, shipping, and other fees. Keep in mind that the dimensions of this plate are not even the size of a standard postcard. But fortunately, there is a more cost-effective way to obtain Gelli plates: by making them yourself. And even better, the process of making them is not laboriously intense nor does it involve many ingredients. But keep in mind that access to a kitchen burner and basic kitchen equipment are involved in this process, as I know that some of you who are reading this article do not have regular access to either of these.
The recipe and instructions I am sharing with you is a modified version of the process found on The Frugal Crafter’s blog. I found that the instructions she gave did not allow for the plates to congeal adequately, resulting in plates that were too soft and delicate for use. I also wanted to be much more specific in my instruction so that you are less likely to encounter any issues. Any grade of glycerin (craft, medical, or consumable) can be used for this project. Also, I included the optional ingredient of peppermint oil or clove oil for the sake of adding an additional preservative, making the plates without it will work perfectly fine, as the addition of glycerin helps prevent any spoilage that would normally occur without it. If you decide to use either of these oils, make certain that you are using essential oils, not flavoring oils for use in baking and candy making, and to gently wash the plates with dish soap after the plates are ready for use, as the excess oil may repel ink or paint a bit.
Permanent Homemade Gelli Plates

Ingredients
- 15 tablespoons gelatin (or 15 Knox gelatin packets)
- 1½ cups glycerin
- 1½ cups boiling hot water
- 3 to 5 drops peppermint or clove essential oil (optional)
Equipment
- 2-quart heat-safe bowl (can be larger, if you do not have smaller bowl available)
- 2-cup liquid measuring cup
- dry measuring cups
- measuring spoons
- large mixing spoon
- small saucepan
- paring knife
- rubber spatula
- baking sheets, heat-safe plates, heat-safe bowls with broad bases, or other similar containers (has to be at least ¼ inch deep)
- dish soap and water (if needed)
- paper towels (if needed)
- clean, sharp scissors (optional)
- plastic zipper bags and/or firm plastic sheets trimmed to the width and length of containers
Instructions
- Measure and add 15 tablespoons gelatin, 1½ cups glycerin, and 3 to 5 drops of peppermint or clove essential oil (optional) to a 2-quart heat-safe bowl. Mix the ingredients until they are fully incorporated and no lumps remain.
- In a small sauce pan, bring 1½ cups of water to a full boil.
- Add the heated water to the bowl containing the gelatin, glycerin, and oil mixture. Mix until well-blended and gelatin is fully dissolved.
- Quickly pour mixture into desired container. Make mixture coats the inner base of the container completely and is at a depth of at least ¼ inch. Ensure that the container sits on a level surface.
- Allow for the container to remain undisturbed until fully cooled and that the mixture forms a very firm gel. This process will take several hours, but letting the mixture set overnight will ensure the proper consistency.
- With a paring knife, very carefully insert the blade against the inner edge of the container and glide it against the entire inner perimeter of the container. Take care not to tear the gel sheet.
- Insert the blade of a rubber spatula and glide it along the same path you made when you used the paring knife.
- Carefully slide the rubber spatula under the edge of the gel sheet. Slowly lift the spatula once the blade of it is fully inserted, taking care not to tear the gel sheet.
- While the gel sheet is elevated, gently grab the gel sheet with your free hand. Very slowly peel the gel sheet from the container, once again ensuring that the gel sheet does not tear.
- If you had used some essential oils, very gently wash the outer surfaces gel sheet under running water with a very small amount of dish soap. Do not use any washcloths, sponges, or scouring pads to clean the sheet—use your hands. Lightly blot any water from the surface with a dry paper towel to speed up the drying process.
- (optional, but recommended) With a clean pair of sharp scissors, trim any ragged excess gel from the top edge of the gel sheet.
- Store the gel sheet between plastic sheeting cut to the length and the width of the gel sheet and/or insert the gel sheet into a plastic zipper bag. (I recommend both because sliding gel sheets into plastic zipper bags alone can be a clunky process. And storing the gel sheets between plastic sheeting alone can still leave the edges of the plates exposed, possibly inviting dust to stick to their edges. While you can wash any stuck dust off, storing them in the bag allows you to not take that additional step.)

If you find yourself accidentally tearing the sheet at some point during the process, fear not. Depending upon the material and dimensions of the container you are using, you can pop the container with the hardened gel in it into the microwave for about a minute to melt the gel. And if you are using a container that is too larger and/or not microwave safe, you can always tear up the gel and place it into a saucepan, and melt the gel over low heat on the stove. Once the gel is fully melted, if poured back into the container if needed, you allow for the gel to properly set again, and you can make another attempt at removing the gel sheet.
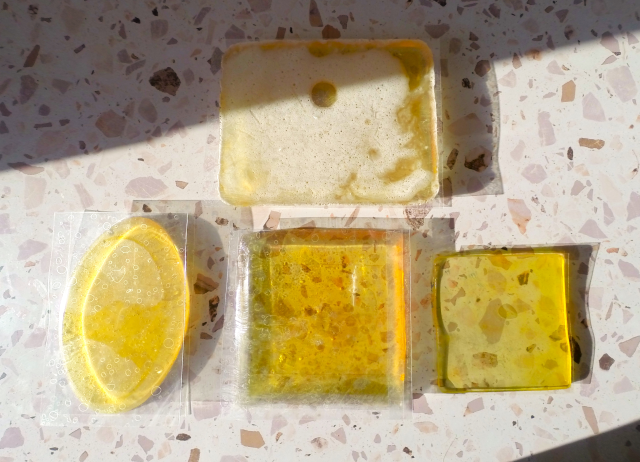
Another perk to making your own sheets is that you can make a more varying array of plates of different shapes. To give you an idea of what I mean, take a look at the photo I have displayed below. The sheet in the bottom right corner is one that has been commercially produced. The other sheets are ones I have made myself. (The reason why the rectangle and oval have a white foam on their top surface is that I had used an immersion blender to mix them. I do not recommend doing this nor using a standard blender or food processor.)
Seeing that the FAQ page on the Gelli Arts website mentions that their plates do not contain products derived from animals, I would presume that you could use agar agar to make them. (I get the feeling that carrageenan or pectin would produce plates that are too soft.) Perhaps one of these days, I will experiment with it—if I do, I’ll be sure to provide an update.
Before I close this post, if you are unsure of where to begin with using gel plates, check out the printing basics category available on Gelli Arts’ website. They can provide far more information and techniques than I could. At a quick glance, I can see that they suggest some ideas that haven’t occurred to me!